
Chapter 1 on progress Report
1st vlog explaining what I've been doing since April, as that was when i started thinking about my final year project.
the basic outline being what I've been doing in Zbrush, character ideas, and any other things I've learnt for 3rd year.
________________________________________________________________________________
Chapter 2 on progress Report
________________________________________________________________________________
Chapter 2 on progress Report
2nd
blog explaining what’s happened since the last video. I
unfortunately lost my voice so I had to postpone a vlog till it came
back so here it is. this is explaining what’s been happening since
last, so basically I’ve drawn up my 5 characters in different
outfits, and I’ve also been looking at more modelling research for
low poly modelling. at the same time and what is not mentioned in the
video I’ve been doing several sketching researches which are now up
and finished on my blog for all to see.
Chapter 2.5 (5/01/2014)
OK so
my computers microphone has decided it's not sure whether it wants to
work or not and the program I was using to record my screen, has
decided to go on an extended holiday...and by that I mean it thinks
it's not real and therefore doesn't want to open.
any-who,
I thought I’d do a written progress report as I haven't uploaded
anything onto my blog in a while because I was making all the models
for my group work, and that took longer then expected. The other
problem I had, was that I felt like my skills around Christmas time
wouldn't do the models justices and I realised I needed to draw out
what pose the character would have as the hair would have to be
modelled in said pose. so in order to reassure myself I made this
bust of an anime character after seeing a very nicely done stylised
bust of another anime character
Kill la Kill - sculpt 2 by Zaphk on deviantART
My
next plane of action however will be to start on my first model
Cindy, I'm hoping that I will get all the models down in around a 7
week period depending on how group work goes as my main job for my
group work is almost finished, and I can also hopefully get my mic
and video recording to work some time soon!! :D
in
the mean time here’s what I've been doing in my group work ->


________________________________________________________________________________
Chapter 3 part 1 (9/01/2014)
SO Since my last update I have started on my first and easiest of models (until I have to do her bows) Cindy. At the moment I've been working on her for a day and a half and so far she is looking like this ->

I made several attempts before hand which didn't go to well and well....all looked like this at the start and i didn't like it:

so the one in the middle I think is the models i later on developed into the product that you see right now. I think my only concern at the moment is that because of the nature of the character it might be better to go with a less realistic character. I think somewhere down the line when I've finished modelling the character if I feel like the character needs to be semi realistic like a league of legends style then I'll'll make her eyes bigger and her hair more blocky rather then realistic.
________________________________________________________________________________
Chapter 3 part 2 (10/01/2014)
so day....3 or 2....i'm gonna go ahead and say 2 of cindy and she's looking pretty good. She finally has her onesie on and it has a bit of detailing in. One of the problems i kept on encountering was i kept on making the mesh around the onsie too thin so when i was dynemeshing the whole thing i kept on getting holes, so i had to use the inflat took to make sure there weren't any more problems.

________________________________________________________________________________
Chapter 3 part 3 (14/01/2014)
Ok so since the last time i managed to sort the hair out into a position i wanted it to flow in, just so i could have a base starting point and model it round the bow on her onesie. I also managed to add the bow ties round her leg, where all i basically did was extract a circular mesh from the onesie to allow it to have a tight and binding fit round her leg. and the bows on the side were basically duplicated then edited from her chest bow, to hang and fit better on her leg

________________________________________________________________________________
Chapter 3 part 4 (15/01/2014)
So for this bit i have finally finished the onesie it has the necessary creases and an added zip put in place on the back. I did realise though on pretty much every onesie the zip is on the front, especially if there's a hood, however i didn't want the zip to get in the way of the pattern and the main focus on the front, plus the back was a little bit bare so i decided it needed something there, plus on my concept art i drew the zip on the back which is what I'm sticking to. i have now started to work on the hair where you can see the hair is starting to shape quite nicely.

________________________________________________________________________________
Chapter 3 part 5(16/01/2014)
so the hair is finally finished with the added hairband and bow (however the bow will be hidden while the hood is up as it intersects with the mesh of the onesie). the hair was pretty time consuming to do as i was using the snakehook brush for a while around the back of the hair, and then around the from i used curvetube brush just to add in the extra strands of hair. afterwards i dynameshed the hair and started adding detail in after subdividing the mesh. after finishing the hair and all of the detailing i then positioned it for how i want the pose of my character to be.

I also used this artists work as inspiration for the hair, however i did put my own flare onto it be getting carried away with my work.
 |
| Hazardousarts on Deviantart |
________________________________________________________________________________
Chapter 3 part 6 (17/01/2014)
so i finally managed to finish the shoes last night although they were a bit of a nightmare to do, because i wasn't sure whether to have them as big cartoony kind of shoes, or to keep the true to the rest of the model and have them semi-realistic. i only really pondered this because a game like kingdom hearts give almost a realistic look however get away with the characters having massive feet.
however in the end i went for semi realism look and had to search the web for (and i couldn't remember the name of the type of shoes so i called them) Alice styled shoes and tried to get the sole of the shoe as close to the real thing as possible. i also had a hard time flattening the shoes as well but i managed to do it with the move tool, Flatten and Hpolish brush. the bows again were duplicated from the bows on the side of the leg this time as the top bow had be shaped round the hair at this point as well. So i reshaped the bows on the shoes and mirrored it once i was finished.
so my next plan of action is to start on the claws, and once i've done them, i can merge the character together for posing and stick her on a podium for a turntable.

Also as a side note for giggles, i opened up Zbrush
after it crashed on me for the 100th time in a row,
and zbrush offered up it's quicksaves like it usually
does (god bless quick/autosaves) and i find my
character posing for a selfie in one of them which i
found too hilarious and halted me for a while on
work, because everytime i looked at it it made me laugh :D

________________________________________________________________________________
Chapter 3 part 7 (20/01/2014)
Yay Cindy now has claws. they were a bit of hassle to complete because while i was trying to make the claw part look sharp and threatening using the Clip Curve tool it would do this weird thing if symmetry got in the way where it would try to cut the mesh the best it could, but would also decide that the end result would involve it have an intersecting mesh which didn't help at all, but after careful positioning and the help of HPolish tool i managed to get it right finally.

________________________________________________________________________________
Chapter 3 part 8 (24/01/2014)
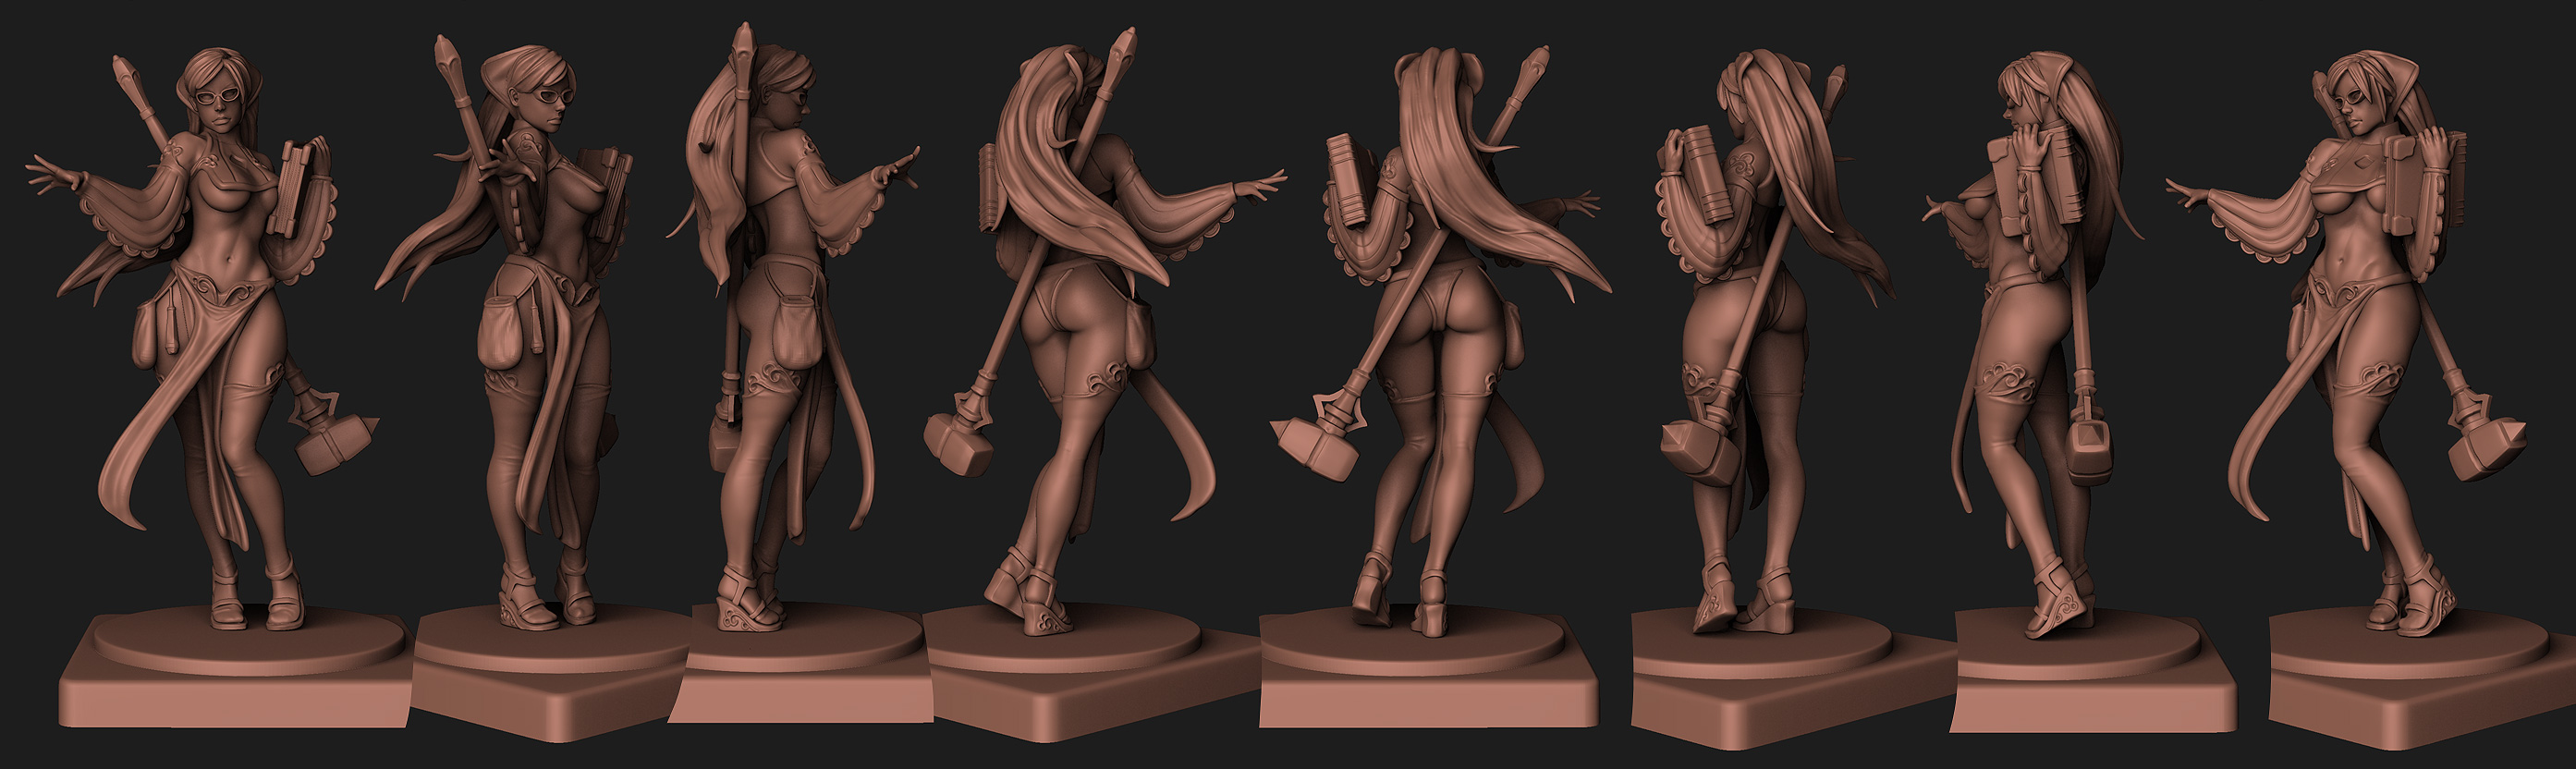
Cindy is finally posed and her podium is ready to go.
For a better detail of the model click on the models tab above to get the finished version and little bit on the model. or click here to go straight to the models tab ->
Models Tab!!! :D

 ________________________________________________________________________________
Chapter 4 (28/01/2014)
So with Cindy finished it's time to move onto Tasha who will be a Low poly and coloured mesh, both human and werewolf. although i did think about using fibre mesh on her considering she has the most hair/fur out of any of the characters, however i'm leaving that with Leah who is next to be modelled as she has quite interesting hair to model round. I have also been messing around with the fibre mesh tool in Zbrush which is pretty straight forward, as well as learning an exploring xnormals as Zbrush is not the easiest or funniest program to try and normal map with, where as xnormal has done a wonderful job exporting a normal map for me as shown in the picture below in maya.


________________________________________________________________________________
Chapter 5 Part 1 (29/01/2014) - The Tasha Arc

________________________________________________________________________________
Chapter 5 part 2 (30/01/2014)
the 2nd day of work on Tasha, and the new wireframe for her is complete her body stands at 7,000 polys however, but i still have no intention for rigging and animating her, although the set up was meant for that as a hypothetical situation however hopefully it would still be fine for a situation such as that anyway.


Chapter 5 part 3 (04/01/2014)


and of course her werewolf side is still in the process of normal mapping as well, the texture covering her body is a Alpha i made for her to look like fur. However the strange thing is, is that whenever i view her in maya's mentalray viewer her chest doesn't look right at all so i'm going to see if i can do anything about that problem. Also i'm not sure about her hair....might get rid of it.


The gun is a PGM-338 Rifle designed for long range use only. i did have a choice between a Arctic Timberwolf rifle and a 800px-Remington MSR, however the PGM-338 has a longer range compared to the others so i though for a sniper rifling killer who doesn't like to be far away from home the longer the better.


NEXT MODEL
THE RIFLE LOVING LEAH!!


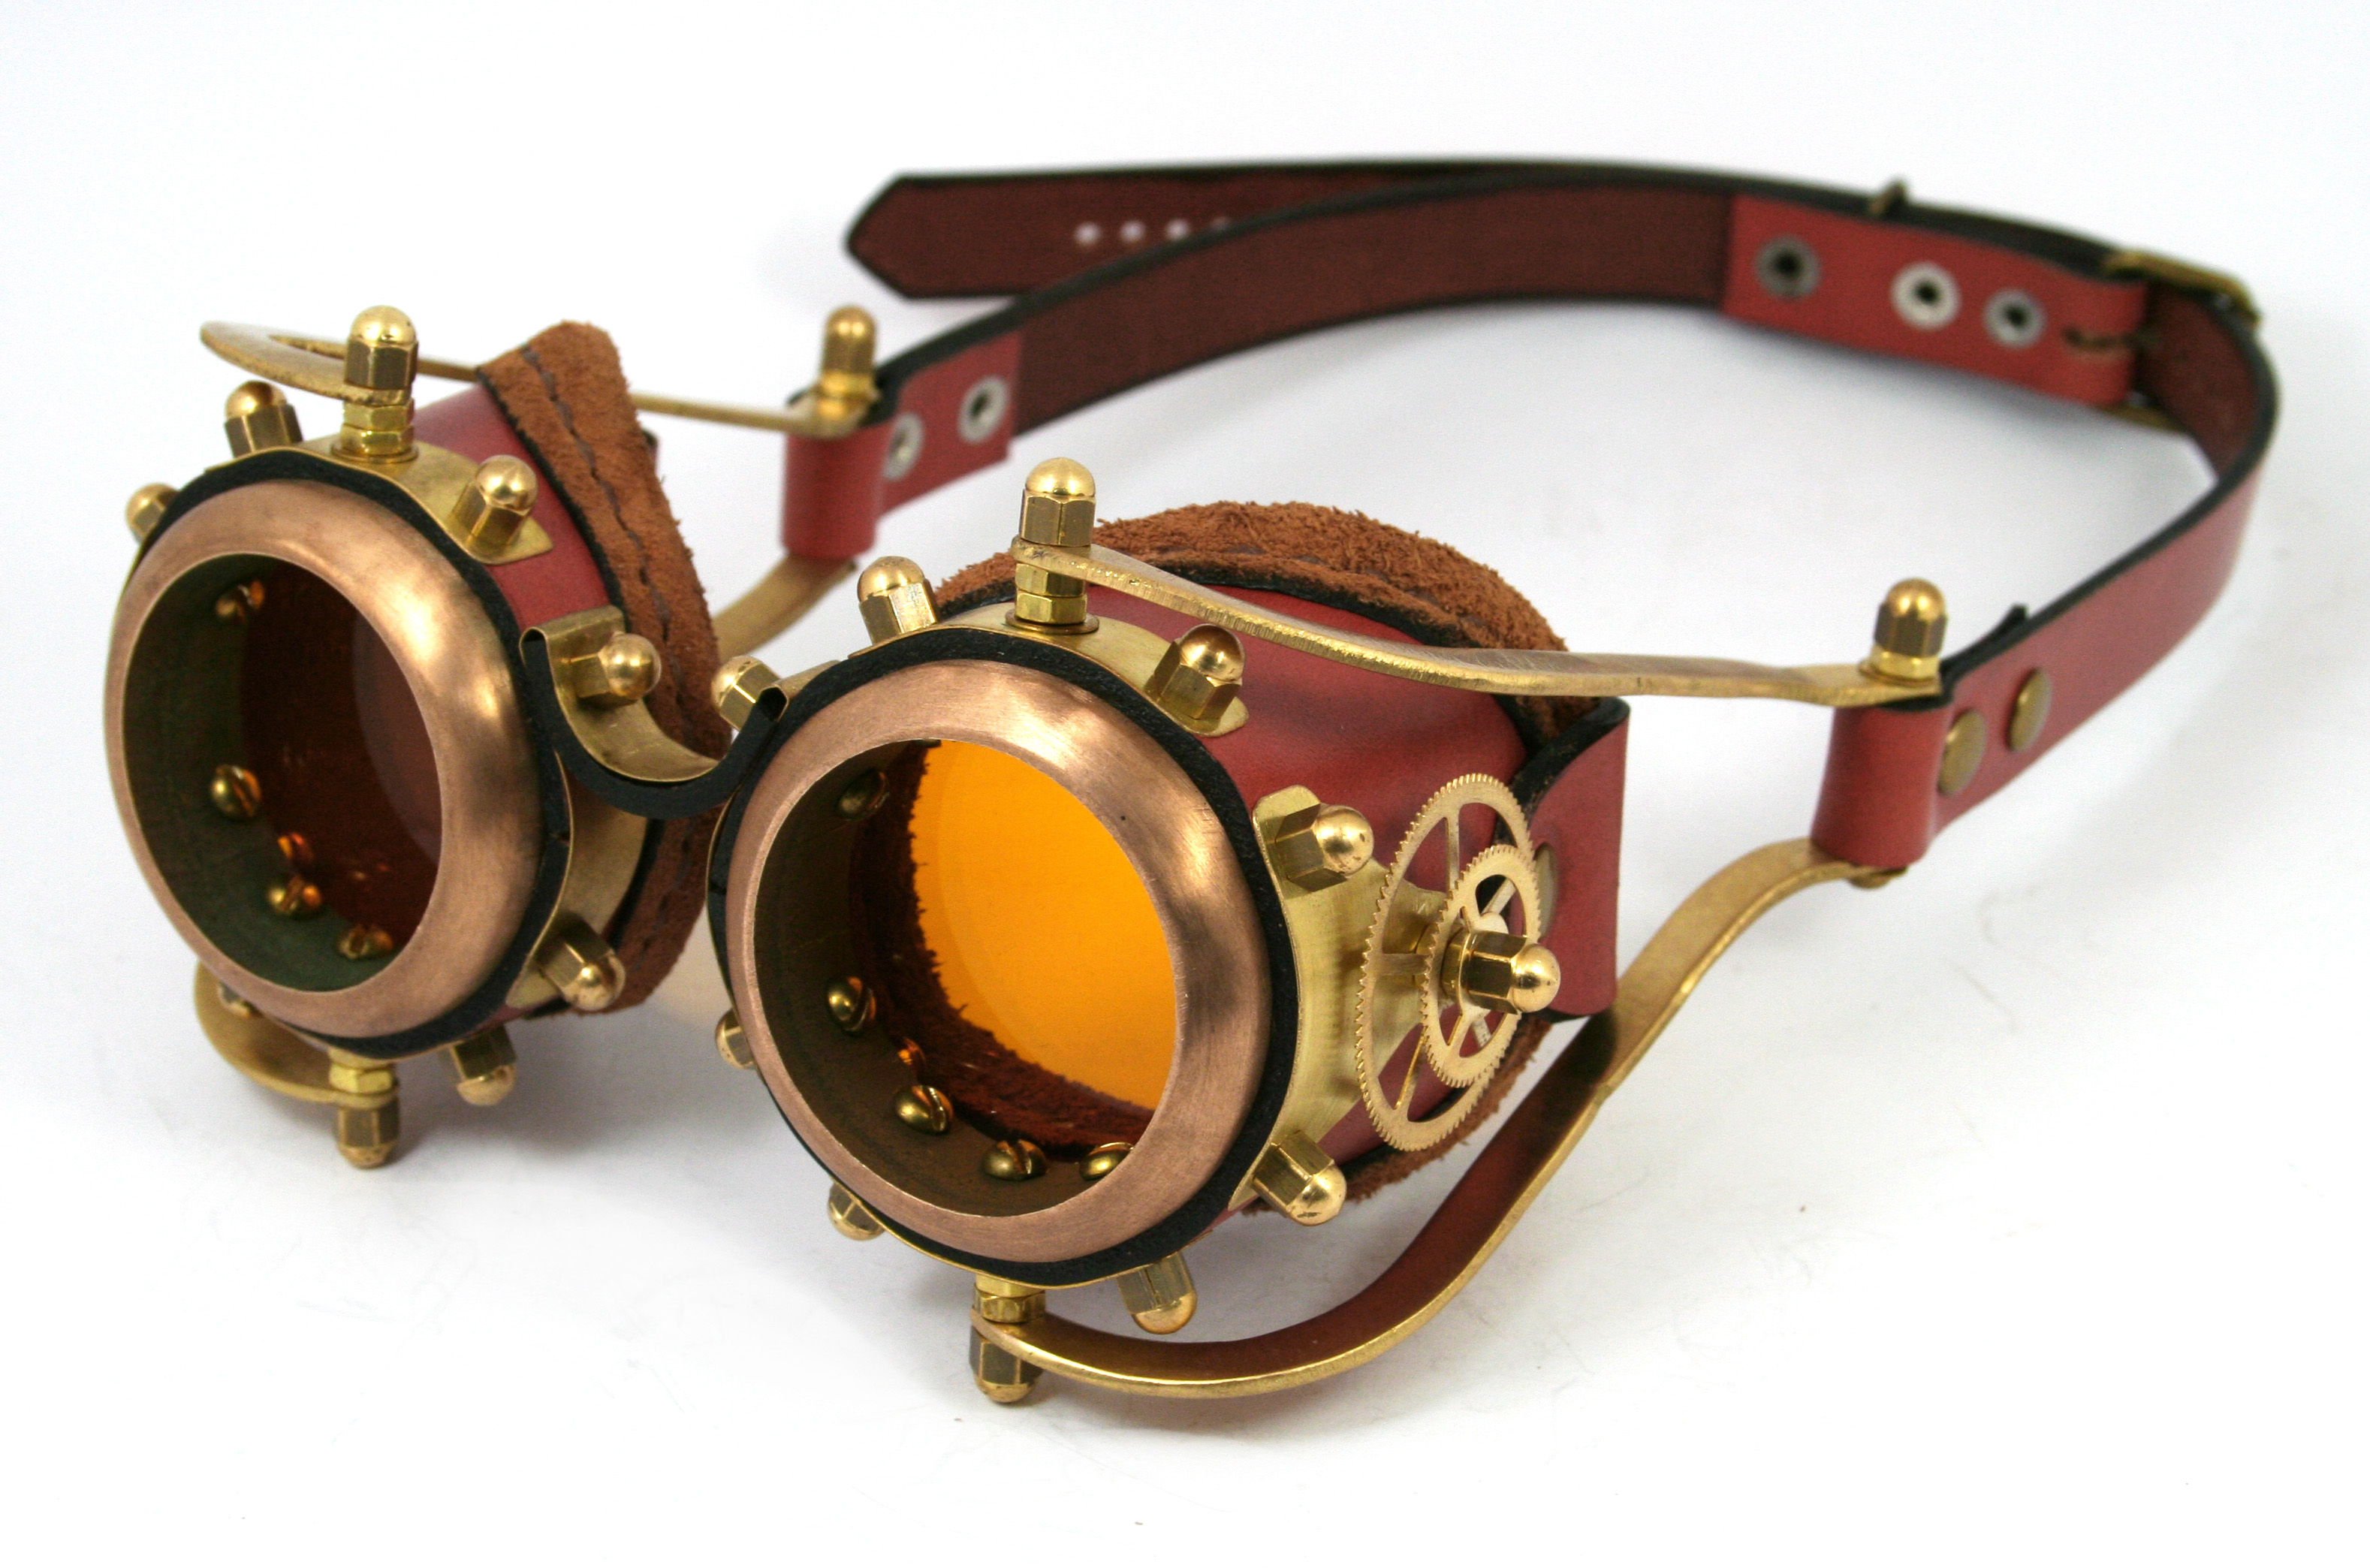
 OMG LOOK GOOGLES!!
.......so i started with just, and extracted band around the head to map out where i want and what size the goggles should be when they were placed around her head. i exported the body and the band into maya and started working on the goggles. i had 2 attempts before i started making this version using the ringed shape that is around the lens to start of with and then extruded from there. made the goggle in maya because i wanted to give them a hard surface edge to them. the goggles were based around these pictures.

Chapter 3 part 7 (20/01/2014)
Yay Cindy now has claws. they were a bit of hassle to complete because while i was trying to make the claw part look sharp and threatening using the Clip Curve tool it would do this weird thing if symmetry got in the way where it would try to cut the mesh the best it could, but would also decide that the end result would involve it have an intersecting mesh which didn't help at all, but after careful positioning and the help of HPolish tool i managed to get it right finally.
________________________________________________________________________________
Chapter 3 part 8 (24/01/2014)
Cindy is finally posed and her podium is ready to go.
For a better detail of the model click on the models tab above to get the finished version and little bit on the model. or click here to go straight to the models tab ->
Models Tab!!! :D
________________________________________________________________________________Chapter 4 (28/01/2014)
So with Cindy finished it's time to move onto Tasha who will be a Low poly and coloured mesh, both human and werewolf. although i did think about using fibre mesh on her considering she has the most hair/fur out of any of the characters, however i'm leaving that with Leah who is next to be modelled as she has quite interesting hair to model round. I have also been messing around with the fibre mesh tool in Zbrush which is pretty straight forward, as well as learning an exploring xnormals as Zbrush is not the easiest or funniest program to try and normal map with, where as xnormal has done a wonderful job exporting a normal map for me as shown in the picture below in maya.
Chapter 5 Part 1 (29/01/2014) - The Tasha Arc
SO, Tasha has begun construction and in but a day she has been zshpered, had adaptive skin applied, and has been blocked out for how i want her to look. i've given her quite the muscular tone as she's very active, hence the small chest and the slight tone of abs on her stomach. i'm going to add a bit more muscle on her legs as she quite the sprinter considering shes a werewolf so i would expect her character to be quite the runner type overall. the next stage now is to remesh it to it's lowest poly and with appropriate (what i think is appropriate) edge loops for this type of character.
The main thing i will be learning from this character will be having a low poly mesh with great amount of detailing due to normal maps and experimenting around with texturing in Zbrush or possibly, if i get the chance MARI.
Chapter 5 part 2 (30/01/2014)
I also managed (much to my surprise oddly enough) to get most of the clothing done in the same day. the clothes on the model stand at 600 polys being the lowest to the highest of 2000 at most, however i will redo some of the retopologising as it should be lower that what's given, as i want the assets on Tasha to be in the 1,500 range and lower. however the process is moving fast then expected and hopefully i can finish the hair at some point and start on Tasha's Wolf form soon.
Chapter 5 part 3 (04/01/2014)
So Tasha is finished completely in terms of the high poly mesh. i will say trying to retopologise the hair was interesting to say the least. With the little flicks of hair it was hard to get around that problem, however i did mange to create an ok topology, but again it's not very good, but it is low in poly's and hopefully when i export a normal map for it, the topology/UV map shouldn't get in the way.
________________________________________________________________________________
Chapter 5 part 4 (07/01/2014)
For the Werewolf i have decided to add fibermesh to the character rather then model the fur, just to see if i can do it to the best of my ability and i think it might look a lot better then if it was modelled. i have also been using the wolf heads from Twilight as they have side quarter and front views of the wolf jacob's snarl and roar, which i felt was good reference for my characters roar.
the snarl so far \/ \/ \/
________________________________________________________________________________
Chapter 5 part 5 (11/01/2014)
Ok so the werewolf side of tasha is finished and my original plan was to put fibermesh all over her body...however the polycount skyrocketed, it didn't look very good, the fibers didn't comply to which way i wanted them to move, SO i decided that fiber mesh on the face and tail were the best places to put the, because they were the only place which complied with how i wanted the whole thing to look
and i'm sorry the background is so dark i forgot how to make that part lighter.
________________________________________________________________________________
Chapter 5 part 5 (11/01/2014)
HAA HAAA finally after so long the normal is finally working. it has taken me....a good portion of my week to sort out the blooming normal as it wasn't complying at all. i also realised while trying to import fibermesh from zbrush into maya, that it really doesn't like it at all and my computer could not handle it, so many errors and frozen screens occurred so i decided to ditch that idea and maybe look into using the nhair system in maya...that is if i can use it properly or maya doesn't crash.
However i am.....a week over when tasha should have been finished so i might have to put her on hold and move onto working onto Leah, and start modelling her gum.
and of course her werewolf side is still in the process of normal mapping as well, the texture covering her body is a Alpha i made for her to look like fur. However the strange thing is, is that whenever i view her in maya's mentalray viewer her chest doesn't look right at all so i'm going to see if i can do anything about that problem. Also i'm not sure about her hair....might get rid of it.
________________________________________________________________________________
Chapter 6 (21/01/2014)- Leah's Legacy - Side chapter
ok so i'll get back to Tasha, but because i'm just a LITTLE bit far behind on schedule i have decided to move onto Leah and then go back to Tasha when i have a bit more time. so without further a due here is leah guns without the tripod cuz she won't be needing it for her pose. this was fully modelled in maya but i'm going to add some scratches to shown the gun being a bit worn out, and a made up logo for Leah.The gun is a PGM-338 Rifle designed for long range use only. i did have a choice between a Arctic Timberwolf rifle and a 800px-Remington MSR, however the PGM-338 has a longer range compared to the others so i though for a sniper rifling killer who doesn't like to be far away from home the longer the better.
________________________________________________________________________________
Chapter 5 part 6 (19/02/2014)
Right so i'm still working on the Normal map and the textures but i'm getting things sorted....hopefully, however a lot of my time lately has been allocated to group work so unfortunately very little is being done around Tasha at the moment however hopefully i'll some time this week to be working on her and her wolf side.
________________________________________________________________________________
Chapter 5 part 6 (27/02/2014)
AHHH HAAAA finally some time to finish off tasha....AND I HAVE, Tasha is now fully textured and normal mapped, the lighting still needs to be changed however thats something i will do later on if i have a bit of time left, which hopefully i will do.THE RIFLE LOVING LEAH!!
________________________________________________________________________________
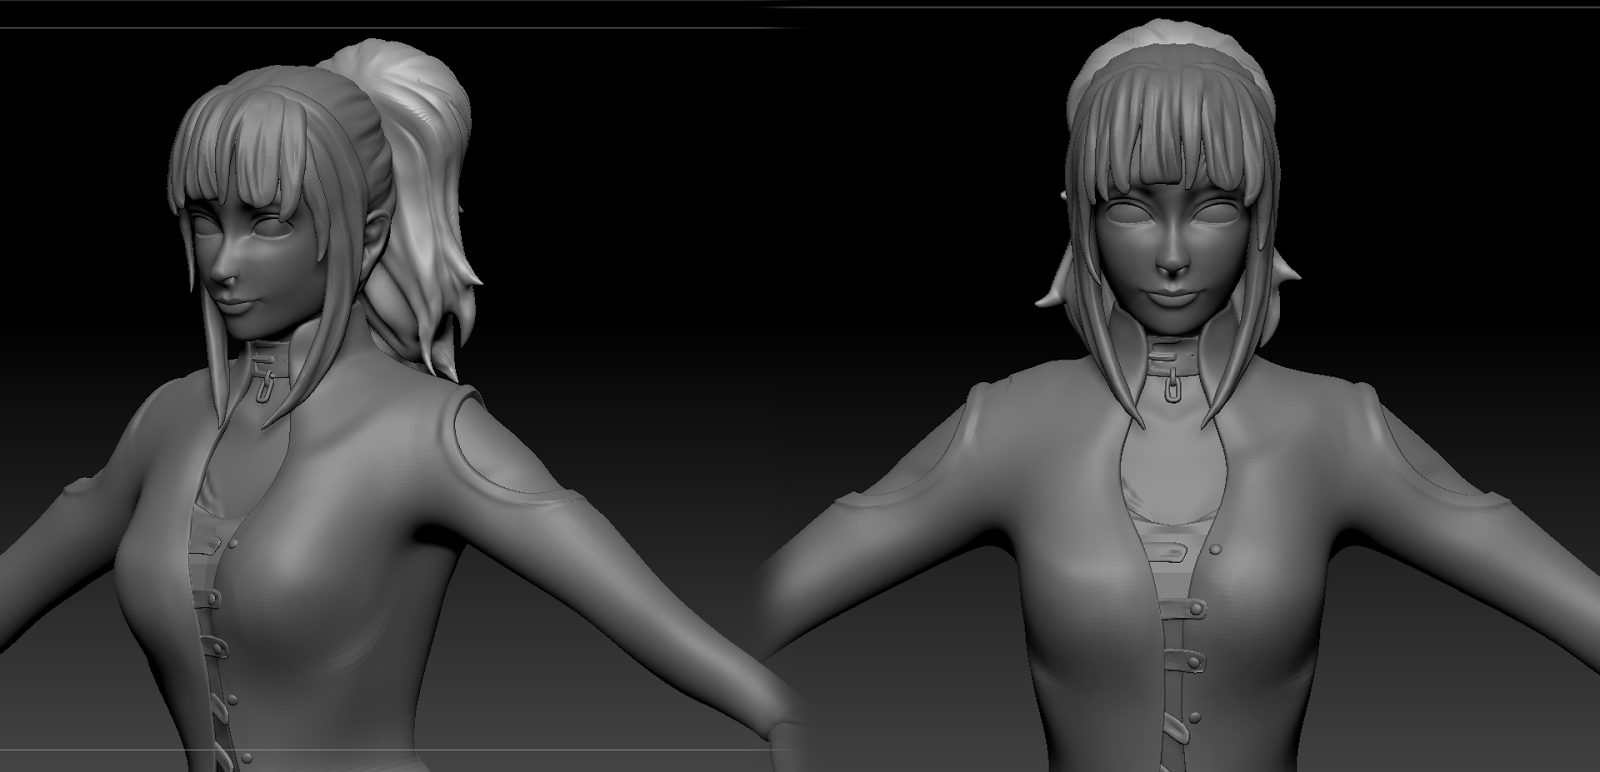
Chapter 6 (08/03/2014)- Leah's Legacy
ok so i may hav forgotten to take screenshots during all the days i was modelling Leah, however over 4 days Leah has finished the low poly, and base meshing parts of her process, now its time to add detail to her clothes body and make the goggles.
most of the outfit was made via extraction and the fibermesh hair is there just to help out on where her hair will be. However i will be fixing that later on when the model is finished. the scarf was made with using both the curve tool and a tube shape then thinning the inside of the mesh and playing around with the deformation tab to relax the shape. the lacing on the boots and the corset were all made previously by hand but i managed to find a brush with helped out with the process so i decided to use that to help me A save time and B making the most of the tools i had.
the head for this character after speaking to the recruiters for the VFX companies said they liked to see if you can base it off from real people so for this character i based her head off this woman, named Ulorin Vex
Her Deviantart - http://ulorinvex.deviantart.com/
and around Nina Agdal's body (due to the fact that she has a column figure which is what i intended for my character to have.) ->
________________________________________________________________________________
Chapter 6 (09/03/2014)- Leah's Legacy - all about the boots
i also started utilising the polygroup tool more now, because for the boots because they had so many layers to it, in terms of the inner boot the outer boot, the laces and the raised part on the side of the boot, they were all created because of polygroups, and i could easily isolate any part of the boot that needed editing.
i also made some gears in maya, because i felt that the original design lacked the amount of gears on the outfit needed to make it have a more steampunk style to it.
________________________________________________________________________________
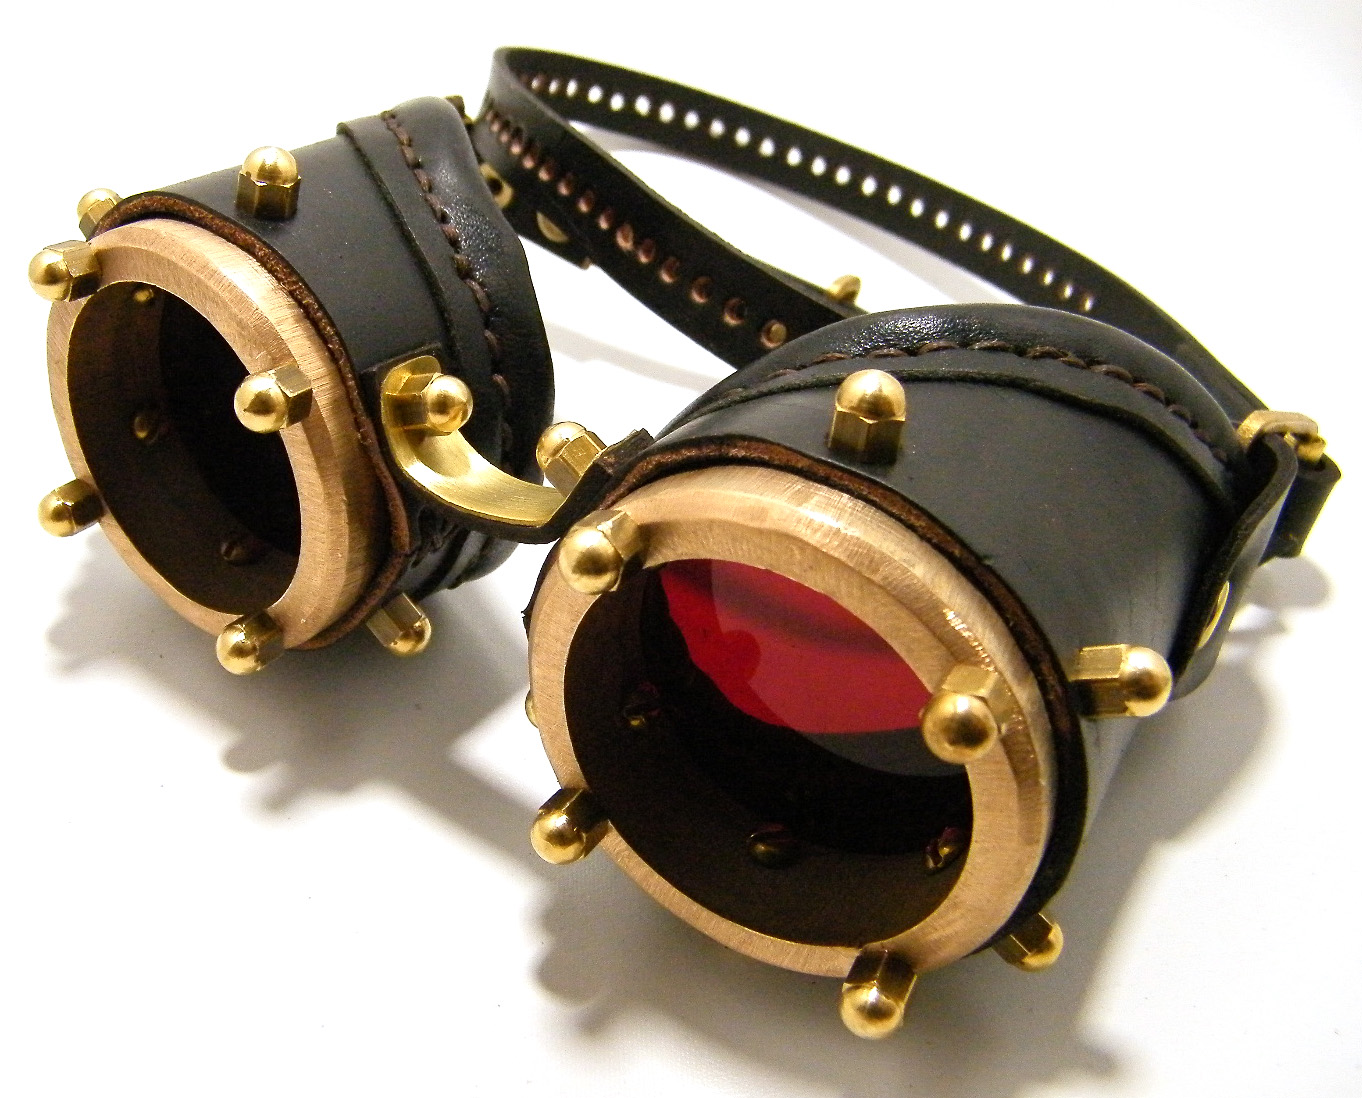
Chapter 6 (10/03/2014)- Leah's Legacy - GOGGLES!!
.......so i started with just, and extracted band around the head to map out where i want and what size the goggles should be when they were placed around her head. i exported the body and the band into maya and started working on the goggles. i had 2 attempts before i started making this version using the ringed shape that is around the lens to start of with and then extruded from there. made the goggle in maya because i wanted to give them a hard surface edge to them. the goggles were based around these pictures.
________________________________________________________________________________
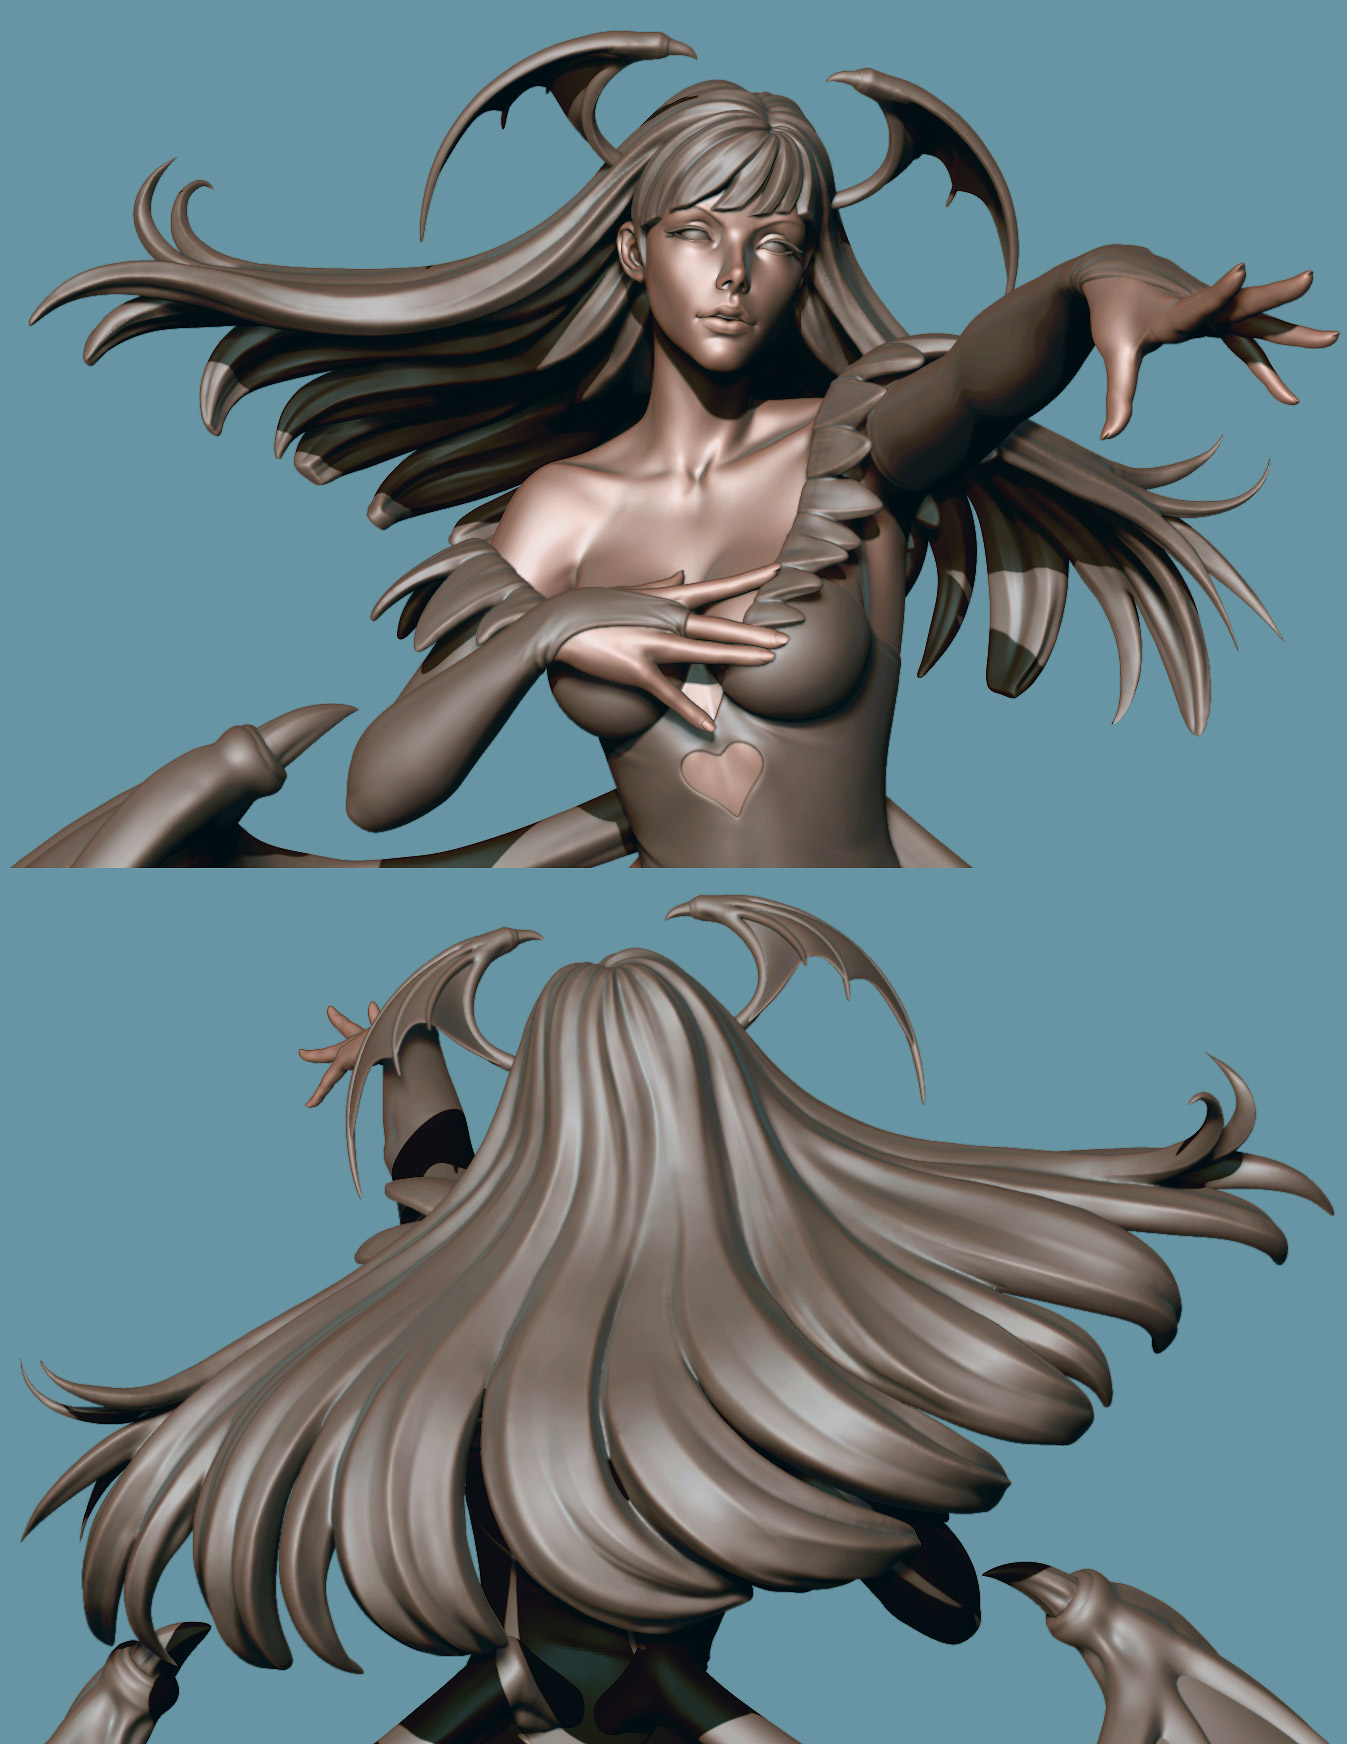
Chapter 7 (10/03/2014)- Silvanna's Bust
while contemplating what to do next about Leah and ultimately getting myself confused around whether to texture her or just focus mainly on the pose, and possibly build yet another accessory for her in maya as well as the gun, i decided to start on creating Silvanna, and because facial features were the thing i had the most issues with i thought i test my ability on doing a speed sculpt of Silvanna as a bust which was a plan i wanted to implement for a while now.
the whole process took 2 hours to complete another 3 hours after filming to polypaint the character. This was merely to answer a question of A has my modelling skills progressed since Cindy, B whether i can capture the features of a person in a short space of time while adding the same details from my own character, and C whether or not i could implement all that i have learnt onto one sculpt.
So here is the final video of the speed sculpt in process however the video content is sped up and chopped down so you can see the main points as to how I've done the whole thing
No comments:
Post a Comment